Tuesday, October 26, 2010

PLT Workshop 5: A Smorgasbord of Ideas!!


A) ZimmerTwins (http://zimmertwins.com/)

What an awesome website! Is this supposed to be for kids, because I definitely went home and showed this to my roommates (I’m a nerd, I know.)

ZimmerTwins is a website that allows you to create mini-movies using basic animation. There are three main characters to choose from, and you can select anything from their expression, to their actions, and even the setting in which each scene takes place. I think this would be a great website for students, and is an interesting alternative to simply writing a creative story.


 In my classroom, I would model story writing with students and get them to create a rough draft, identify characters, setting, plot, etc. This could then turn from a literacy lesson to an exercise in ICT, as they could use ZimmerTwins to turn their story into a movie. It requires a lot of careful planning and organization to ensure the story makes sense, so I think this could also be used as an assessment piece for students. A great resource that I’d love to use in my future classroom!


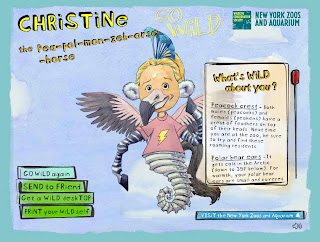
This is a website where you can build a ‘wild’ version of yourself, using a mix of human and animal body parts and features. I think it’s a neat idea and, as Greg said, it would be fun way to introduce yourself to students at the beginning of term. If I were to use this in the classroom, I would get students to develop their own ‘Wild Self’ characters and then do a creative writing exercise about how their character came to be (i.e., How did the ‘Wild Self’ end up with elephant ears, a mermaid tail, and lion paws?)


One reservation I have is that the website has a strong focus on appearance, which is already an issue that is far too prevalent both in and outside of the classroom walls. I think you would have to know your students as a class before using this website, making sure that there aren’t students who are overly sensitive when it comes to appearance.

C) Sketch Swap (http://sketchswap.com/)
I think that the idea behind this website is a great one, but I have a lot of reservations towards it. You first create your own black and white sketch and, upon submitting it, a random sketch drawn by someone else is presented to you. What I like about this website was that it would allow students to use a simple tool and be creative, while also being able to view the ideas of others. However, a few of us received random sketches that were quite graphic, including ones depicting cannibalism, guns, and various forms of violence. Luckily for me, I was a shown a cute drawing of a Moose… my favourite animal!


 This would be a great website if you were able to control where the sketches came from, such as other classrooms around the school or even partnering up with other schools internationally. I think using this site in the classroom would require a lot of monitoring, and you’d have to be prepared for how to handle a situation where students receive a sketch that is inappropriate.

D) Reasonably Clever (http://www.reasonablyclever.com/)
This was a pretty neat website where you can build your own online character out of Lego. It’s interesting to see how creative people can be, and a lot of people have created a bunch of different characters and put them into a short story. To be honest, I don’t know how I would use this in the classroom, although I know every child enjoys playing with Lego so they would likely enjoy this activity. One caution is that students would have to be monitored while visiting this website, as the commentary is uncensored and contains topics (drugs, alcohol) that are inappropriate for schools.

Wonder Woman meets... Barney?
E) Roller Mache (http://www.abc.net.au/rollercoaster/rollermache/)
This is an interesting site that shows children real-world jobs in animation. Please note: They're NOT all occupied by males! It's great to be able to show students the 'behind-the-scenes' and helps them to understand how much work goes into the films they see.

Additional Uses: 

- Use familiar movies and look at the 'extras' (i.e., the making of Toy Story DVD)
- Could create storyboards and try to translate these into a movie

F) Xtranormal (http://www.xtranormal.com/)
Maybe a bit too advanced for primary students, but would be a great way to create a polished presentation. I think this could be great as a whole-class project that could run long-term. Students could put together a story line, but instead of doing a play could work on this during their ICT sessions and present it to the school. One issue with this is the ad banners that pop-up, as some are inappropriate.


G) In-class Exercise: Dictation ("Ode to a Spell Checker")

Interesting fact that I didn't know, courtesy of Greg (and I quote): "You'll raise children's understanding if you do dictation for 10 mins everyday. Kids enjoy it and improve in their writing and spelling skills."

This was a great exercise to explore homonyms and show how reliant we are on spell-checkers!

I think I went a little space-bar crazy!


H) Zip Tales (http://ziptales.com.au/)

What a great resource! Schools can take out a yearly subscription & use it as often as they like. Students could send in their own creative writing pieces, and the people who run the site will animate them. Very cool!

Idea for a future lesson:
- Make and Do: Make a short film and then review the 'how-to' process with the students (it's always good to know what you're talking about before exposing it to the students).


I) Dvolver (http://dfilm.com/live/home.html)
This site can be used to create a short story, allowing you to choose the setting, main characters, and  a short plot. One caution: You definitely CANNOT use this in class - the characters are quite scandalous!!

PLT Workshop 4: Dust Echoes and Microsoft Excel


18/08/2010

Very glad I brought my headphones to class today!

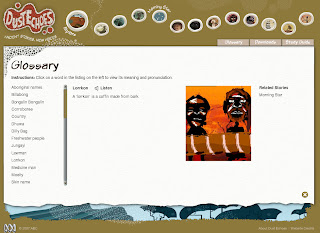
During the first part of our workshop, we explored the Dust Echoes website and I was amazed at what a powerful resource this was (are there more websites like this?). Dust Echoes was shown at the 2007 Melbourne International Film Festival, and contains beautiful animated movies about aboriginal Dreamtime stories. I’ve never seen animation quite like this before – the images were not necessarily the most advanced and lifelike, but were basic, vivid, and moving. I can see how this would be a great way to engage children at the start of a lesson, and wish I knew about this during the ‘All Aussie Adventures’ unit at my previous placement! This site not only contains animated interpretations of each story, but also has the original version of the story, a key-word glossary, and study guides (in PDF format) with suggestions of lesson plans to go with each movie. Amazing! 


Our task was to select a film from Dust Echoes to create a storyboard, which to me seemed like a type of visual summary. We used our prior knowledge from Week 1’s lesson on Inspiration, and used the print screen function to capture defining moments in the movie (I chose ‘Morning Star’). We then pasted these images into Inspiration and created a visual storyboard. I think this would be a great exercise for students, as it not only helps them to practice summarising and the sequencing of events, but also shows the meaning they gathered from the story. For example, ‘Mermaid Story’ is a film without any words, so it would be very interesting to hear student’s interpretation of its meaning. They could do this by creating a storyboard on Inspiration, and could then read the original and compare their perceived meaning to the one the original story intended.

My 'Morning Star' Storyboard!

Christine’s Classroom: Dust Echoes

I would be thrilled to use this in the classroom if it was relevant, but I think I’d have to take caution in my selection of movies to show. The one we watched in class, ‘Spear’, was quite graphic and maybe too powerful for early to middle primary. This is definitely a website that you’d want to carefully look through before showing it to students!

B) Microsoft Excel (http://www.m-ms.com/us/)

To be honest, this part of the session gave me quite the confidence boost! I’ve had a lot of experience with Excel, but I never knew a spreadsheet could look so… pretty. 

My pretty graph :)
  We explored the M&M’s website and used it as a stimulus to gather data and information about the company. I was impressed with how detailed the website was, and can see how kids would be excited to read about the ‘unique personalities’ of each M&M’s colour (very clever). Although we were given the initial question (How many of each colour are within one bag of M&M’s?), there are many different routes you could go with this topic.

For instance, I began to look up the nutrition content and ingredients list, and found that the website contains a lot of information on this. It may not be as easy to find as some of the ‘more fun’ activities on the website, but the fact that it provides this information shows that you could turn this into a lesson that involves everything from maths to health. Who would have thought?

Delicious & Nutritious? Not quite...
 We experimented with using different types of graphs to present data, and I had a lot of fun selecting cells and filling them with colour to suit the topic we were exploring. We also labeled the graphs and I learned how to make the individual bars within a bar graph their own colour – very handy when comparing different coloured M&M’s!

Christine’s Classroom: Excel

I think Excel is a program that is targeted to upper primary and requires quite a bit of modeling on behalf of the teacher. After creating far too many spreadsheets in my last job, I was unaware of how this program could be used in a more creative (and colourful) way! I think that Excel would be great to use after students have had experience with graphs and have a good understanding of how graphs are used to represent information. I think just getting students to find the numbers and entering them into Excel would not encourage a deeper understanding of this area in maths.

PLT Workshop 3: Design Briefs and Quia


11/08/2010

I’ll start off by saying that I really enjoyed this workshop and gathered a lot of ideas on how to use technology in the classroom.

A) Design Briefs
The first part of the session started off differently from our previous workshops, as we didn’t go straight onto the computers. Thuan and I paired ourselves up and collected the following materials: a small paper frog, a rubber band (apparently not called an ‘elastic’?), some sticky tape, and a small piece of cardboard. The goal was to make the frog jump using only the above materials. We were given a design brief to document our materials, our goal, our intended ‘plan of action’ (jump, froggy, jump!), our final results, and finally any modifications we could have made to make the frog jump differently (further, higher, faster). I worked with Thuan on this, and I think were both a bit daunted at first, worrying that we’d be two post-grads with an ‘unhoppy’ frog (you’d be sad too if you couldn’t jump!) We came up with a few ideas, but finally settled on using the materials to create a mini slingshot.

Slingshot Design:
- We folded the cardboard so that it had a small base and taped this base to the table.
- We created a small hole in the cardboard using the tip of a pen (FYI: You’re actually not allowed to do this, as a pen is not one of the materials given. Can you keep a secret?)
- We then pulled the rubber band through the hole in the cardboard and tied it into a knot to prevent it from slipping through.
- We placed the frog on the top of the cardboard, created tension in the rubber band by pulling it down, and upon release – PRESTO! The frog jumped! (And now Thuan and I can breath again…)


What I found really interesting about this mini-experiment was that almost every pair had come up with a different way to make the frog jump! Although the activity required only a basic understanding of physics, it highlighted how many different ways there are to solve a single problem. The notion of ‘multiple intelligences’ came to my mind, as some pairs chose to first sketch their design, some talked it through, and others just ran with it until the frog had some hop!

Quia is a website you can use to create your own quizzes, games, and surveys. I’ve used a similar tool before, called Survey Monkey, but found Quia to be much more user-friendly and easy to get the hang of!

Our first task was to design a quick activity using various templates, such as hangman, fill-in the blank, and word jumbles (rearranging letters to spell a topic word). I chose to do a word-jumble activity that focused on Canadian animals (Quelle surprise?). I think this would be a great way to get students to practice their spelling words, especially if they have access to the Internet at home!

Canadian Animals - Word Jumble
 The second task we were given was to create a quiz based on a topic. Can you guess what I chose? (Hint: It starts with a ‘C’ and ends in ‘anada’…) This was also very simple to create, and even simple steps such as choosing question types (true/false, multiple choice, etc) and randomizing answers were as easy as selecting a radio button below each question! You also have the option to assign different point values to each of the questions.

Oh Canada! Quiz (Do you know what Poutine is?)


Christine’s Classroom: Quia

I plan to use this during my next teaching round, as it’s a great way to review basic spelling and get students ‘tuned in’ to a specific topic (maybe Canada?). I think it would be great to have each student create their own account, so that they could log-on from home and take quizzes or even create their own activities.

*Quick Tips: One point that really resonated with me was the inappropriateness of using ‘hangman’ with children. An alternative on this site was to use a bear hanging onto balloons – every time an incorrect letter is chosen, one of the balloons pops & the bear begins to drop. A much more kid-friendly, appropriate, and cute option!

PLT Workshop 2: Microsoft Publisher


03/08/2010

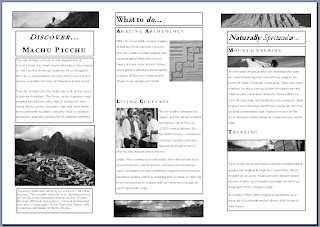
Today we learned how to use Microsoft Publisher to create a brochure based on a travel destination. I’ve experimented with Publisher before on my old PC, but have never used it to create this type of document. What I really like about this program is how polished the final product can look. There are various layouts for the brochure, some with a bit more ‘flare’ to them, while others are more straight and intended for professional use. I chose to use Machu Picchu as my destination, and was impressed with how easy it was to just save images from the internet (Right click on image - ‘Save as’) and then insert them into the brochure.

One thing I found difficult with this lesson was that we rushed through creating our brochure. I know the workshop is just meant to expose us to different programs and encourage us to explore them on our own time, but I’m a bit of a perfectionist when it comes to these things. Needless to say, I was a few steps behind my peers this morning (I just need to resize this picture… and change this font… and reposition the title…)

Oooh... how very 'rustic'!
 

Christine’s Classroom: Microsoft Publisher

While on my previous teaching round, students were doing an integrated unit on ‘All Aussie Adventures’ and their final project was to create a brochure based on their favourite Australian destination. I think this program would have been a great one to show them, but I don’t know if I would have encouraged them to use it for their ‘good copy’.

Although I like how polished Publisher is, I think kids really enjoy being hands-on and creative when it comes to producing things like brochures, posters, and mock advertisements. In my classroom, I think I would use Publisher to model how to create a brochure and explore aspects such as layout and overall appearance. I would then get students to go off and create their own brochure using physical materials, while keeping the Publisher brochure in the classroom for a reference.

*Quick Tips: The ‘print screen’ function proved very useful this session, as it allowed me to capture the image in this blog post. At first I was going to Print - Save as PDF, but found that most of my formatting was being lost. I ended up taking a print screen while in ‘Print preview’; however, I was unable to get a shot in colour. Hmmm… may have to play around with this a little longer. (Although I will admit, I think the ‘rustic look’ of my brochure suits the destination I’ve chosen.)  :)

Brochure in Colour - Where did my formatting go?

PLT Workshop 1: Inspiration


28/07/2010
In our first Learning Technologies workshop, we were introduced to Inspiration, a software that is the self-proclaimed ‘ultimate thinking and learning tool’. Quite the bold statement, but it has some truth to it.

I am a big believer in brainstorming and mind mapping, and did a lot of this during the ‘tuning in’ phase of my lessons while on teaching rounds. It’s an excellent way to get students thinking about the topic at hand, and also helped me to identify their prior knowledge. Although these exercises are somewhat interactive for students, I sometimes found them a bit monotonous… For example, Lesson 1: ‘Ok class, we’re starting our Integrated unit on Oceans. Let’s brainstorm!’; Lesson 2: ‘Ok 3/4s, we’re going to be talking about Australian animals today. Let’s make a mind map!’; Lesson 3… well, you get the point!


 What Inspiration provides is a more visually appealing way to organise information. You can enter something as your central ‘Topic’, and then use arrows (‘links’) and clipart to branch out from this topic and create subtopics. What I like about this is how neat and organised it looks, especially in comparison to some of the in-class brainstorms I’ve made in the past…


Christine’s Classroom: Inspiration

I would definitely use this program in my classroom, but I would model it for the students first. It’s a great way to incorporate ICT into the ‘tuning in’ phase, and the wide-range of clip art would likely get student’s attention. After modeling the program a few times, I would allow students to experiment with using Inspiration during ICT sessions, and would hold small focus groups to make sure students understand how to use it efficiently.

Drawbacks:
- Although this software is quite user-friendly, I did find it difficult to control the appearance of the arrows or ‘links’ between topics and sub-topics. After a bit of frustration, I realized that the arrow linking the ideas needs to point to a specific part of the clip-art. This would be a bit of a time-waster for students, so I would show them specifically how to do this.

- I think students would go off on a tangent when selecting clip-art that is relevant to their brainstorm or mind-map. I would encourage them to first type in the text for the subtopics, and then choose visuals that are appropriate.

- I’m not really sure when you would choose to use the mind map template versus the brainstorming one… Any suggestions?


*Quick Tips:  
During the workshop, we were shown how to use the ‘print screen’ function, which I was familiar with beforehand. It’s a bit tedious on a PC (print screen - open Paint - Paste - Crop - Cut & paste into new paint document) and is much easier to do on my Mac (shift + F4 + spacebar gives you a ‘snapshot’ image of the area you’ve selected). It was interesting to hear how many people didn’t know about this function on their computers – I don’t know what I would do without it!

An Intro to Technology in the Classroom


Blog.
A year ago, I would have thought this word referred to some sort of strange illness.

Only upon moving from Canada to Melbourne nine months ago did I discover that blogs are not limited to the tech-savvy, but can also be used as a powerful tool for sharing everyday experiences, opinions, and general information with those around us. Sure, I can communicate to friends and family back home via email, social networking sites, and Skype. But what’s different about a blog is that I can sit down once a week, write a reflection on what I did, where I went, and who I saw, and then leave it up to those who are interested to visit my blog and stay updated. (So, basically only my parents check it…)

Prior to entering this learning technologies course, I didn’t realize that a blog could also be used as a way of reflecting on educational experiences, and that I could share my trials and errors (which inevitably occur when technology and I cross paths) with others who are interested in learning about the same programs. I’m hoping this blog can be used not only as a reflective tool for myself, but can also provide some useful tips on how technology can be used in the classroom.

Here goes… something?

*P.S. I’ve had some bad experiences where I’ve lost posts before, so I’ve chosen to type my entries in Microsoft Word first & then paste them all in. I highly recommend doing this when you’re putting something important online… losing a ton of hard work due to ‘technical difficulties’ is not a pretty thing!